How to Fix Camera not Showing in Device Manager
Last Updated on Nov. 16, 2021 |Screen Mirroring
Can’t find your camera on the computer? Here’s how to fix it when your camera is not showing in the device manager.
When you purchase a nice webcam or camera to improve the video recording quality of your Windows PC, a problem that often comes with it is that the webcam or camera is not showing in the device manager on your computer. This may be due to multiple reasons, such as disabled access, driver update issues, etc. It’s annoying when such a problem occurs, as it may impact the use of your nice webcam/camera.
But don’t worry! We got this handled. In this article, you will learn about where your webcam/camera usually is in the Device Manager and how to solve the problem when it’s not there.
Where is your Webcam/Camera in Device Manager?
If you have connected your webcam/camera to your computer, it usually shows up under the “Cameras” category. However, there may be circumstances where it appears in other categories depending on your webcam/camera settings.
Therefore, when you can’t find your webcam/camera in the Device Manager, make sure to first check the categories of “Imaging devices” or “USB devices/USB device hub” before moving on to the methods below.
How to Fix Webcam/Camera not Showing in Device Manager
If you have checked the above categories under Device Manager and still don’t see your camera, you can proceed with the following methods to fix the problem.
Method 1. Check Hardware Connection
Since your webcam/camera add-on is not a built-in component of your computer, it’s never redundant to check its connection with your computer, for example, wires, networks, etc. Sometimes, a seemingly hard technical problem may just be a simple connection issue.
Method 2. Enable Camera Access
If your webcam/camera is successfully connected, the next thing you need to check is the access settings on your computer. Sometimes, your camera is set by default as off before you allow access to it on your computer. Thus, you need to check this setting and enable camera access on your device. Here’s how:
- Go to Settings > Privacy.
- Select the Camera section.
- Under the section that says, “Allow access to the camera on this device”, you should see a message saying, “Camera access for this device is on”. If not, click Change to turn it on.
- Restart your computer and you should be able to find your webcam/camera in Device Manager now.
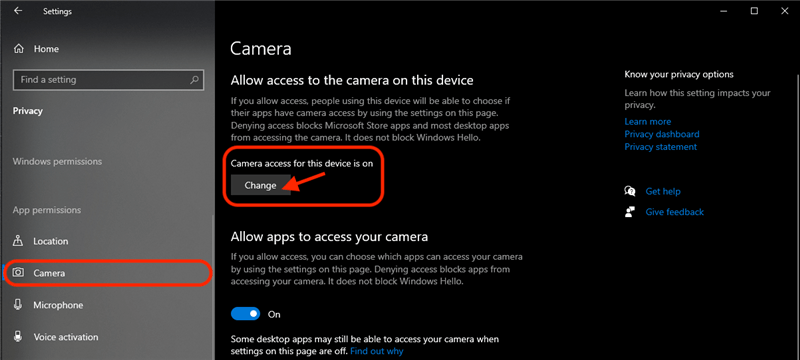
Allow Camera Access in Settings
Method 3. Check for Software Update
After checking hardware connection and access control, it’s logical then to check the software. If the driver for your webcam/camera doesn’t automatically update or if you recently update your Windows system yet your software falls behind, the result may be your camera not showing in the Device Manager. In this case, you could check for driver updates in Settings:
- Go to Settings > Then go to Update & Security.
- Select the Windows Update section.
- Click “Check for updates”.
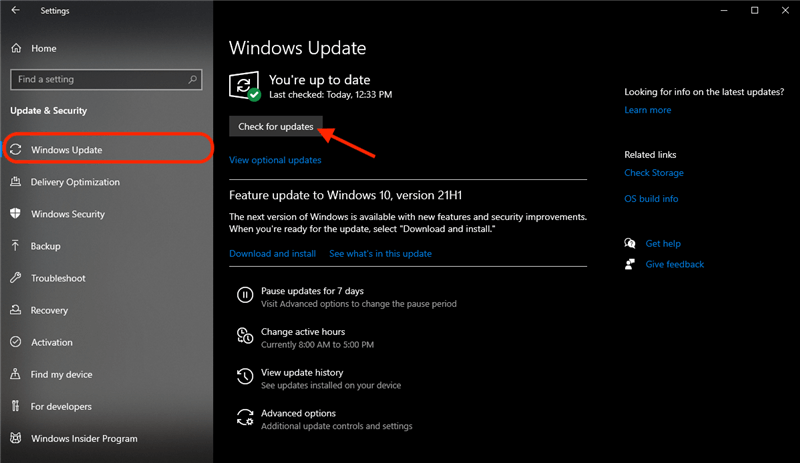
Check for Software Update
- Wait for it to check and load. If your webcam/camera driver needs an update, it will show up here. Update it and then check your webcam/camera in the Device Manager again.
- If your webcam/camera still doesn’t show up in the Device Manager, click the “Scan for hardware changes” icon right under Help. This quick scan will help your computer detect the webcam/camera after the driver update.
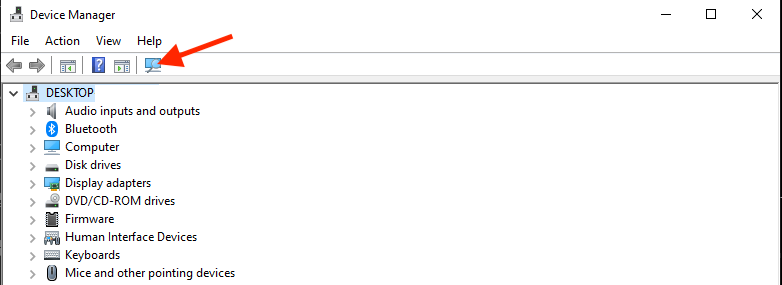
Scan for Hardware Changes in Device Manager
Method 4. Let Windows Troubleshoot
If the above methods can’t solve the problem, Windows may be able to help! The troubleshooting function on Windows can help you identify issues with your webcam/camera. Follow the steps below to run the troubleshooter:
- Go to Settings > Then go to Update & Security.
- Select the Troubleshoot section. You will see a list of recommended troubleshooting. Choose Hardware & Devices and then click “Run the troubleshooter”.
- If you don’t see any recommendations, you can click “Additional troubleshooters” to find a list of other troubleshooters. Choose Hardware & Devices and then click “Run the troubleshooter”.
- Wait for it to check and load. If Windows detects a problem, it will provide a possible solution. You can apply it to see if it fixes the problem.
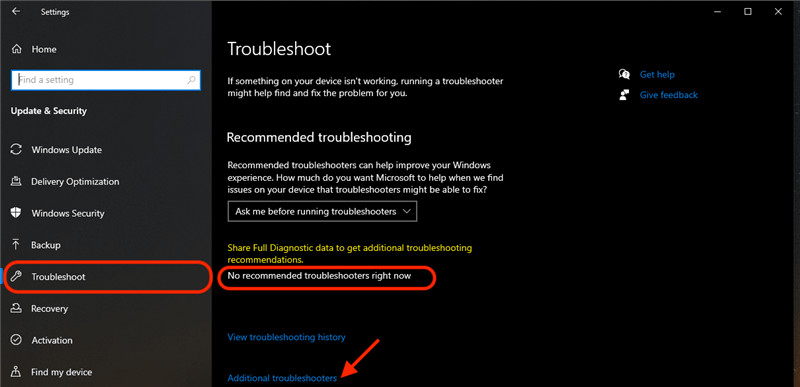
Windows Troubleshoot
Method 5. Add a Webcam/Camera Manually
The last resort when you still can’t find your webcam/camera after all the methods above: you can manually add your webcam/camera to it. See the steps below:
- Go to Device Manager.
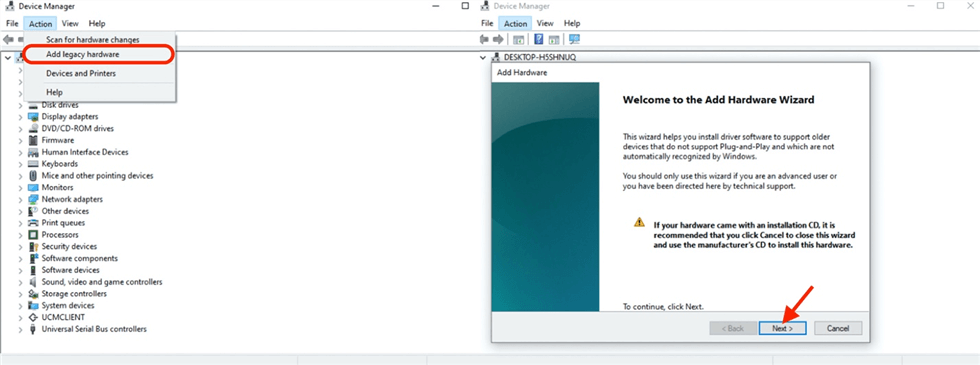
- Click Actions and then click “Add legacy hardware”.
- When prompted, click Next.
- Select the option that says, “Install hardware that I manually select from a list (Advanced)”.
- Select “Cameras”, “Imaging devices” or “USB devices/USB device hub” depending on the settings of your webcam/camera. Then click Next.
- Now you can install your webcam/camera to the Device Manager.
- If you have a driver for the webcam/camera, click “Have disk” and then select it.
- Otherwise, click Next to see a list of other devices you can install. Select your webcam/camera and then click Next.
- Restart your computer. Now your webcam/camera should be successfully added to the Device Manager.
Manually Add Hardware in Device Manager
If you are unsure of which option to choose, try one of them and proceed to the next step. When you can’t find your webcam in the following steps, go back to this step and try another option.
Bonus Tip. Fix Camera not Showing in Device Manager by AnyMirror
AnyMirror, as a powerful mirror tool, can mirror Android & iOS screens, audio, cameras, and microphone to the computer. It also can help you fix the camera not showing in the device manager issue by turning your phone’s camera into a flexibly movable HD webcam.
As long as you want, you can use your Android phone as a computer camera anytime and anywhere without technical requirements. Here are the main features of AnyMirror:
- Mirror your phone’s camera to the computer with a few clicks (iPhone and Android).
- Connect via Wi-Fi flexibly or USB cable stably – choose what’s best for you.
- Support all Android brands with Android 5 and above such as Samsung, HUAWEI, Xiaomi, etc.
- Support iPhone/iPad/iPod touch and work well on both Windows and Mac computers.
Now follow the detailed steps about mirroring your iPhone camera to computer on both Mac and Windows computers.
Step 1. Download and Install AnyMirror on your Computer and your phone
1. Download AnyMirror on Mac/Windows computer > Then double click on “anymirror-en-setup.exe” (“anymirror-en-mac.dmg” on Mac) to install it.

Select Function on AnyMirror
2. Then search AnyMirror in App Store and tap GET to download it on your iPhone/iPad.

Search AnyMirror in the App Store
Step 2. Connect your iPhone to computer with a USB cable
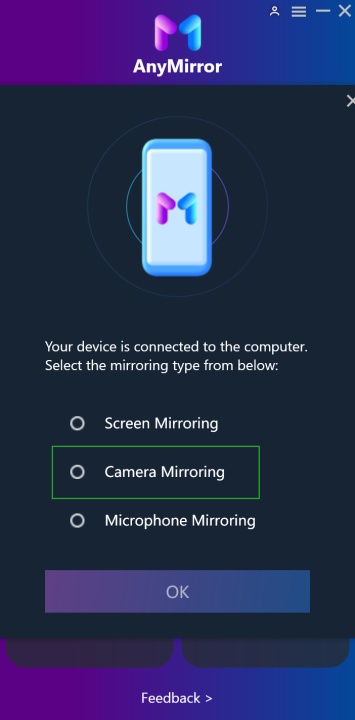
1. Connect your iPhone with a USB cable (You can also connect your iOS device to computer via Wi-Fi) > Choose Camera Mirroring when you see this interface and tap on OK.
Choose Camera Mirroring Mode
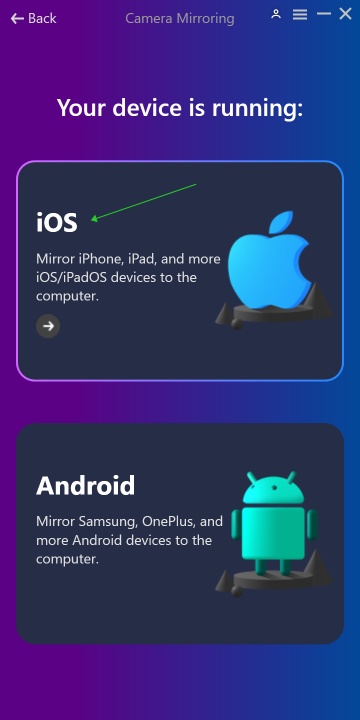
2. Choose Camera Mirroring mode at AnyMirror app on your iPhone > Select USB > Click the Camera Mirroring button on your computer > Choose iOS device on your computer.
Choose iOS Device
Step 3. Mirror iPhone Camera to computer
When your iPhone is detected successfully by AnyMirror, your camera will be mirrored to the computer. You can freely switch the front or rear camera, and cast any scene you want.

Mirror iPhone Camera to Computer
If you use the Camera Mirror function for the first time, please grant Camera and Microphone permission on your iPhone/iPad/iPod touch
The Bottom Line
Have the above methods helped with your problem? Hope you can smoothly find and enjoy your webcam/camera now for your computer. Please comment below if you still have any questions relevant to this issue. Our help is on the way!

Product-related questions? Contact Our Support Team to Get Quick Solution >
![]() Roger Smith
Roger Smith
Get the latest news, how-to and everything from AnyMirror!
AnyMirror How-To Articles
The knowledge base of screen mirroring, video/audio casting, and so on.